Unity学习 |
了解QFramework游戏开发框架
【专栏
/视频】QFramework v1.0 使用指南 - GamePix 独立游戏学院
QFramework 简介
QFramework
是一套渐进式、快速开发框架,适用于任何类型的游戏及应用项目。
QFramework 包含一套 开发架构 和 大量的工具集。
QFramework 特性速览:
开发架构(QFramework.cs v1.0)
简单、易上手、强大
MVC
IOC、分层支持
CQRS 支持
符合 SOLID原则
可以使用 DDD 的方式设计项目
不到 1000 行代码
工具集(QFramework.Toolkits v0.16)
UIKit 界面&View快速开发&管理解决方案
UI、GameObject 的代码生成&自动赋值
界面管理
层级管理
界面堆栈
默认使用 ResKit 方式管理界面资源
可自定义界面的加载、卸载方式
Manager Of Manager 架构集成(不推荐使用)
ResKit 资源快速开发&管理解决方案
AssetBundle 提供模拟模式,开发阶段无需打包即可加载资源
资源名称代码生成支持
同一个 API 可加载 AssetBundle、Resources、网络 和
自定义来源的资源
提供一套引用计数的资源管理模型
AudioKit 音频管理解决方案
提供背景音乐、人声、音效 三种音频播放 API
音量控制
默认使用 ResKit 方式管理音频资源
可自定义音频的加载、卸载方式
CoreKit 提供大量的代码工具
ActionKit:动作序列执行系统
CodeGenKit:代码生成 & 自动序列化赋值工具
EventKit:提供基于类、字符串、枚举以及信号类型的事件工具集
FluentAPI:对大量的 Unity 和 C# 常用的 API
提供了静态扩展的封装(链式 API)
IOCKit:提供依赖注入容器
LocaleKit:本地化&多语言工具集
LogKit:日志工具集
PackageKit:包管理工具,由此可更新框架和对应的插件模块。
PoolKit:对象池工具集,提供对象池的基础上,也提供 ListPool 和
Dictionary Pool 等工具。
SingletonKit:单例工具集
TableKit:提供表格类数据结构的工具集
QFramework 的设计哲学是从每个细节上提升开发效率。
同时 QFramework 还包含丰富的生态。
QFramework 内置模块
Framework:核心架构(包含一套系统设计架构)
CoreKit: 核心工具库、插件管理
ResKit:资源管理套件(快速开发)
UIKit:UI 管理套件(支持自动绑定、代码生成)
Audio:音频方案
相关下载
QFramework 架构
这套架构的特性如下:
基于 MVC
分层
(可选)CQRS 支持
(可选)事件驱动
(可选)数据驱动
(可选)IOC 模块化
(可选)领域驱动设计(DDD)支持
符合 SOLID 原则
源码不到 1000 行
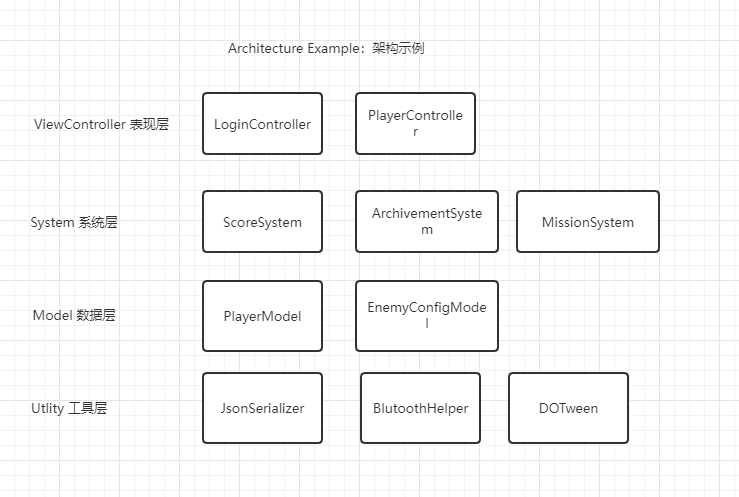
QFramework 架构提供了四个层级:
表现层:IController
系统层:ISystem
数据层:IModel
工具层:IUtility
除了四个层级,还提供了 Command、Query、Event、BindableProperty
等概念和工具。
层级之间的规则
表现层:ViewController层,使用IController接口实现。
负责接收输入和状态变化时的表现,一般情况下,MonoBehaviour 均为表现层
可以获取 System、Model
可以发送 Command、Query
可以监听 Event
系统层:System层。使用ISystem接口实现。
帮助IController承担一部分逻辑,在多个表现层共享的逻辑,比如计时系统、商城系统、成就系统等
可以获取 System、Model
可以监听Event
可以发送Event
数据层:Model层。使用IModel接口实现。
负责数据的定义、数据的增删查改方法的提供
工具层:Utility层。使用IUtility接口实现。
负责提供基础设施,比如存储方法、序列化方法、网络连接方法、蓝牙方法、SDK、框架继承等。啥都干不了,可以集成第三方库,或者封装API
Command:命令,负责数据的增删改。
可以获取 System、Model
可以发送 Event、Command
Query:查询、负责数据的查询
可以获取 System、Model
可以发送 Query
通用规则:
IController 更改 ISystem、IModel 的状态必须用Command
ISystem、IModel 状态发生变更后通知 IController
必须用事件或BindableProperty
IController可以获取ISystem、IModel对象来进行数据查询
ICommand、IQuery 不能有状态,
上层可以直接获取下层,下层不能获取上层对象
下层向上层通信用事件
上层向下层通信用方法调用(只是做查询,状态变更用
Command),IController 的交互逻辑为特别情况,只能用 Command
通用规则是理想状态下的一套规则,但是落实的实际项目,很有可能需要对以上规则做一些修改。
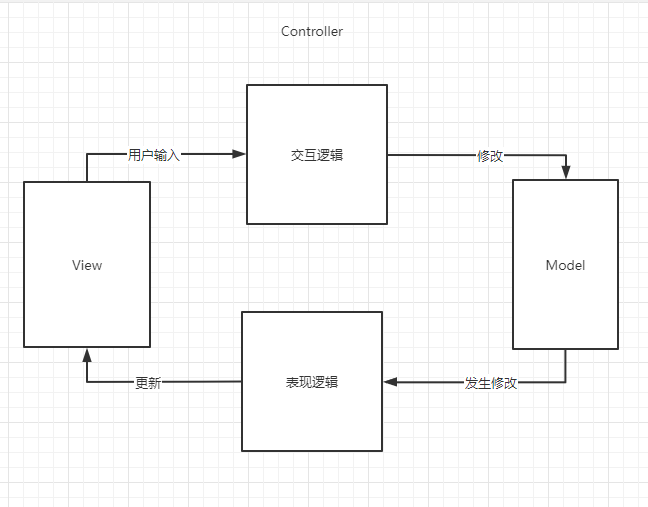
交互逻辑和表现逻辑
交互逻辑,就是从用户输入开始到数据变更的逻辑
顺序是 View->Controller->Model
表现逻辑,就是数据变更到在界面显示的逻辑
顺序是 Model->Controller->View
虽然交互逻辑和表现逻辑理解起来简单,但是它们非常重要,因为 QFramework
接下来的概念都是围绕这两个概念展开的。
View、Model 以及 Controller
的交互逻辑和表现逻辑形成了一个闭环。构成了完整的 MVC 闭环。
而 Controller 本身之所以臃肿,是因为,它负责了两种职责,即改变 Model
数据 的交互逻辑,以及 Model 数据变更之后更新到界面的表现逻辑。
而在一个有一定规模的项目中,表现逻辑和交互逻辑非常多。而一个
Controller 很容易就做到上千行代码。
而大部分的 MVC 方案,解决 Controller 臃肿用的是引入 Command
的方式,即引入命令模式,通过命令来分担 Controller 的交互逻辑的职责。
QFramework 也是使用了同样的方式解决 Controller 臃肿的问题。
案例-计数器
普通的MVC框架
Model、View、Controller
1
2
3
4
5
6
7
8
9
10
11
12
13
14
15
16
17
18
19
20
21
22
23
24
25
26
27
28
29
30
31
32
33
34
35
36
37
38
39
40
41
42
43
44
45
46
47
48
49
using UnityEngine;using UnityEngine.UI;namespace QFramework.Example { public class CounterAppController : MonoBehaviour { private Button mBtnAdd; private Button mBtnSub; private Text mCountText; private int mCount = 0 ; void Start () { mBtnAdd = transform.Find("BtnAdd" ).GetComponent<Button>(); mBtnSub = transform.Find("BtnSub" ).GetComponent<Button>(); mCountText = transform.Find("CountText" ).GetComponent<Text>(); mBtnAdd.onClick.AddListener(() => { mCount++; UpdateView(); }); mBtnSub.onClick.AddListener(() => { mCount--; UpdateView(); }); UpdateView(); } void UpdateView () { mCountText.text = mCount.ToString(); } } }
Model 的代码
1 2 private int mCount = 0 ;
非常简单,只有一个成员变量,但是在这里它其实并不算是一个
Model,他只是要在 View 中显示的一个数据而已,具体为什么不是 Model
我们在后边再说。
View 的代码
1 2 3 4 private Button mBtnAdd;private Button mBtnSub;private Text mCountText;
View 的代码也很简单,View 在 QFramework 的 MVC
定义里就是提供关键组件的引用,比如这三个组件是要在 Controller
代码里要用到的。而其他的例如 Canvas Scaler 等这些组件目前 Controller
不需要,所以就不用声明。
Controller 的代码
1
2
3
4
5
6
7
8
9
10
11
12
13
14
15
16
17
18
19
20
21
22
23
24
25
26
27
28
void Start (){ ... mBtnAdd.onClick.AddListener(() => { mCount++; UpdateView(); }); mBtnSub.onClick.AddListener(() => { mCount--; UpdateView(); }); UpdateView(); } void UpdateView (){ mCountText.text = mCount.ToString(); }
以上就是 Controller 的代码。
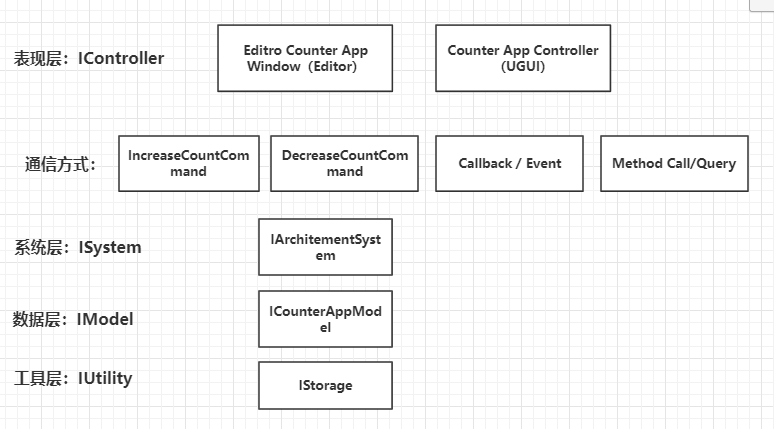
使用了QFramework框架
使用到了
主架构、表现层、系统层、数据层、工具层、命令,分块的代码在每个部分中有展示。
完整代码如下:
1
2
3
4
5
6
7
8
9
10
11
12
13
14
15
16
17
18
19
20
21
22
23
24
25
26
27
28
29
30
31
32
33
34
35
36
37
38
39
40
41
42
43
44
45
46
47
48
49
50
51
52
53
54
55
56
57
58
59
60
61
62
63
64
65
66
67
68
69
70
71
72
73
74
75
76
77
78
79
80
81
82
83
84
85
86
87
88
89
90
91
92
93
94
95
96
97
98
99
100
101
102
103
104
105
106
107
108
109
110
111
112
113
114
115
116
117
118
119
120
121
122
123
124
125
126
127
128
129
130
131
132
133
134
135
136
137
138
139
140
141
142
143
144
145
146
147
148
149
150
151
152
153
154
155
156
157
158
159
160
161
162
163
164
165
166
167
168
169
170
171
172
173
174
175
176
177
178
179
180
181
using UnityEngine;using UnityEngine.UI;namespace QFramework.Example { public interface ICounterAppModel : IModel { BindableProperty<int > Count { get ; } } public class CounterAppModel : AbstractModel ,ICounterAppModel { public BindableProperty<int > Count { get ; } = new BindableProperty<int >(); protected override void OnInit () { var storage = this .GetUtility<IStorage>(); Count.SetValueWithoutEvent(storage.LoadInt(nameof (Count))); Count.Register(newCount => { storage.SaveInt(nameof (Count),newCount); }); } } public interface IAchievementSystem : ISystem { } public class AchievementSystem : AbstractSystem ,IAchievementSystem { protected override void OnInit () { this .GetModel<ICounterAppModel>() .Count .Register(newCount => { if (newCount == 10 ) { Debug.Log("触发 点击达人 成就" ); } else if (newCount == 20 ) { Debug.Log("触发 点击专家 成就" ); } else if (newCount == -10 ) { Debug.Log("触发 点击菜鸟 成就" ); } }); } } public interface IStorage : IUtility { void SaveInt (string key, int value int LoadInt (string key, int defaultValue = 0 } public class Storage : IStorage { public void SaveInt (string key, int value { PlayerPrefs.SetInt(key,value ); } public int LoadInt (string key, int defaultValue = 0 { return PlayerPrefs.GetInt(key, defaultValue); } } public class CounterApp : Architecture <CounterApp > { protected override void Init () { this .RegisterSystem<IAchievementSystem>(new AchievementSystem()); this .RegisterModel<ICounterAppModel>(new CounterAppModel()); this .RegisterUtility<IStorage>(new Storage()); } protected override void ExecuteCommand (ICommand command ) { Debug.Log("Before " + command.GetType().Name + "Execute" ); base .ExecuteCommand(command); Debug.Log("After " + command.GetType().Name + "Execute" ); } } public class IncreaseCountCommand : AbstractCommand { protected override void OnExecute () { var model = this .GetModel<ICounterAppModel>(); model.Count.Value++; } } public class DecreaseCountCommand : AbstractCommand { protected override void OnExecute () { this .GetModel<ICounterAppModel>().Count.Value--; } } public class CounterAppController : MonoBehaviour , IController { private Button mBtnAdd; private Button mBtnSub; private Text mCountText; private ICounterAppModel mModel; void Start () { mModel = this .GetModel<ICounterAppModel>(); mBtnAdd = transform.Find("BtnAdd" ).GetComponent<Button>(); mBtnSub = transform.Find("BtnSub" ).GetComponent<Button>(); mCountText = transform.Find("CountText" ).GetComponent<Text>(); mBtnAdd.onClick.AddListener(() => { this .SendCommand<IncreaseCountCommand>(); }); mBtnSub.onClick.AddListener(() => { this .SendCommand(new DecreaseCountCommand()); }); mModel.Count.RegisterWithInitValue(newCount => { UpdateView(); }).UnRegisterWhenGameObjectDestroyed(gameObject); } void UpdateView () { mCountText.text = mModel.Count.ToString(); } public IArchitecture GetArchitecture () { return CounterApp.Interface; } private void OnDestroy () { mModel = null ; } } }
对比分析
目前像计数器这样的逻辑,使用MVC框架的代码完全没有问题,甚至显得更简单,代码更少。
但是我们要用发展的眼光看待问题。
假如这是一个初创项目,那么接下来很有可能需要添加大量的业务逻辑。
其中很有可能让 mCount 在多个 Controller 中使用,甚至需要针对 mCount
这个数据写一些其他逻辑,比如增加 mCount 则增加 5 个分数,或者 mCount
需要存储等,总之 mCount 在未来可能会发展成一个需要共享的数据,而 mCount
目前只属于 CounterAppController,显然在未来这是不够用的。
我们就需要让 mCount 成员变量变成一个共享的数据,最快的做法是吧 mCount
变量变成静态变量或者单例,但是这样虽然写起来很快,但是在后期维护额度时候会产生很多的问题。
主架构(Architecture<T>)
Architecture 用于管理模块,或者说 Architecture
提供一整套架构的解决方案,而模块管理和提供 MVC
只是其功能的一小部分。
1 2 3 4 5 6 7 8 9 10 11 12 13 14 15 16 17 18 19 20 21 22 public class CounterApp : Architecture <CounterApp > { protected override void Init () { this .RegisterSystem<IAchievementSystem>(new AchievementSystem()); this .RegisterModel<ICounterAppModel>(new CounterAppModel()); this .RegisterUtility<IStorage>(new Storage()); } protected override void ExecuteCommand (ICommand command ) { Debug.Log("Before " + command.GetType().Name + "Execute" ); base .ExecuteCommand(command); Debug.Log("After " + command.GetType().Name + "Execute" ); } }
表现层(Controller层)
负责接收输入和状态变化时的表现,一般情况下,MonoBehaviour
均为表现层。
使用IController接口实现。
1 2 3 4 5 6 7 8 9 10 11 12 13 14 15 16 17 18 19 20 21 22 23 24 25 26 27 28 29 30 31 32 33 34 35 36 37 38 39 40 41 42 43 44 45 46 47 48 49 50 51 52 53 54 55 56 57 58 59 60 public class CounterAppController : MonoBehaviour , IController { private Button mBtnAdd; private Button mBtnSub; private Text mCountText; private ICounterAppModel mModel; void Start () { mModel = this .GetModel<ICounterAppModel>(); mBtnAdd = transform.Find("BtnAdd" ).GetComponent<Button>(); mBtnSub = transform.Find("BtnSub" ).GetComponent<Button>(); mCountText = transform.Find("CountText" ).GetComponent<Text>(); mBtnAdd.onClick.AddListener(() => { this .SendCommand<IncreaseCountCommand>(); }); mBtnSub.onClick.AddListener(() => { this .SendCommand(new DecreaseCountCommand()); }); mModel.Count.RegisterWithInitValue(newCount => { UpdateView(); }).UnRegisterWhenGameObjectDestroyed(gameObject); } void UpdateView () { mCountText.text = mModel.Count.ToString(); } public IArchitecture GetArchitecture () { return CounterApp.Interface; } private void OnDestroy () { mModel = null ; } }
系统层(System层)
帮助IController承担一部分逻辑,在多个表现层共享的逻辑,比如计时系统、商城系统、成就系统等
使用ISystem接口实现。
1 2 3 4 5 6 7 8 9 10 11 12 13 14 15 16 17 18 19 20 21 22 23 24 25 26 27 28 29 public interface IAchievementSystem : ISystem { } public class AchievementSystem : AbstractSystem ,IAchievementSystem { protected override void OnInit () { this .GetModel<ICounterAppModel>() .Count .Register(newCount => { if (newCount == 10 ) { Debug.Log("触发 点击达人 成就" ); } else if (newCount == 20 ) { Debug.Log("触发 点击专家 成就" ); } else if (newCount == -10 ) { Debug.Log("触发 点击菜鸟 成就" ); } }); } }
数据层(Model层)
负责数据的定义、提供数据的增删查改方法。
使用IModel接口实现。
Model
的引入是为了解决数据共享的问题,但不只是为了让数据和表现分离,这一点是非常重要的一点。
数据共享分两种:空间上的共享和时间上的共享。
空间的共享很简单,就是多个点的代码需要访问 Model 里的数据。
时间上的共享就是存储功能,将上一次关闭 App
之前的数据存储到一个文件里,这次打开时获得上次关闭 App 之前的数据。
数据共享 的问题通过 引入 Model 就可以解决了。
但是,需要共享的数据放 Model
里,不需要共享的,能不放就不放 。
1 2 3 4 5 6 7 8 9 10 11 12 13 14 15 16 17 18 19 20 21 22 23 24 25 public interface ICounterAppModel : IModel { BindableProperty<int > Count { get ; } } public class CounterAppModel : AbstractModel ,ICounterAppModel { public int Count1; public BindableProperty<int > Count { get ; } = new BindableProperty<int >(); protected override void OnInit () { Count = 0 ; var storage = this .GetUtility<IStorage>(); Count.SetValueWithoutEvent(storage.LoadInt(nameof (Count))); Count.Register(newCount => { storage.SaveInt(nameof (Count),newCount); }); } }
工具层(Utility层)
负责提供基础设施,比如存储方法、序列化方法、网络连接方法、蓝牙方法、SDK、框架继承等。也可以集成第三方库,或者封装API。
使用IUtility接口实现。
1 2 3 4 5 6 7 8 9 10 11 12 13 14 15 16 17 18 19 public interface IStorage : IUtility { void SaveInt (string key, int value int LoadInt (string key, int defaultValue = 0 } public class Storage : IStorage { public void SaveInt (string key, int value { PlayerPrefs.SetInt(key,value ); } public int LoadInt (string key, int defaultValue = 0 { return PlayerPrefs.GetInt(key, defaultValue); } }
命令(Command)
负责数据的增删改。
参考交互逻辑和表现逻辑
1 2 3 4 5 6 7 8 9 10 11 12 13 14 15 16 public class IncreaseCountCommand : AbstractCommand { protected override void OnExecute () { this .GetModel<ICounterAppModel>().Count.Value++; } } public class DecreaseCountCommand : AbstractCommand { protected override void OnExecute () { this .GetModel<ICounterAppModel>().Count.Value--; } }
大家可能会问,一个简单的数据加减操作,至于创建一个 Command
对象来承担么?看不出来好处呀,反而代码更多了。
如果整个项目只有一个简单的数据加减操作,那使用 Command
有点多此一举,但是一般的项目的交互逻辑,是非常复杂的,代码量也非常多,整个时候使用
Command 词汇发挥作用。
具体发挥什么作用,使用 Command 可以带来很多便利,比如:
Command 可以复用 ,Command 也可以调用 Command
Command 可以比较方便实现撤销功能 ,如果 App 或者
游戏需要的话
如果遵循一定规范,可以实现使用 Command 跑自动化测试。
Command 可以定制 Command 队列 ,也可以让 Command
按照特定的方式执行
一个 Command 也可以封装成一个 Http 或者 TCP 里的一次数据请求
Command 可以实现 Command 中间件模式
等等
OK,通过引入 Command,帮助分担了 Controller 的交互逻辑。使得
Controller 成为一个薄薄的一层,在需要修改 Model 的时候,Controller
只要调用一句简单的 Command 即可。
Command 最明显的好处就是:
就算代码再乱,也只是在一个 Command
对象里乱,而不会影响其他的对象。
讲方法封装成命令对象,可以实现对命令对象的组织、排序、延时等操作。
更多好处会随着大家的实践慢慢体会到。
Command拦截
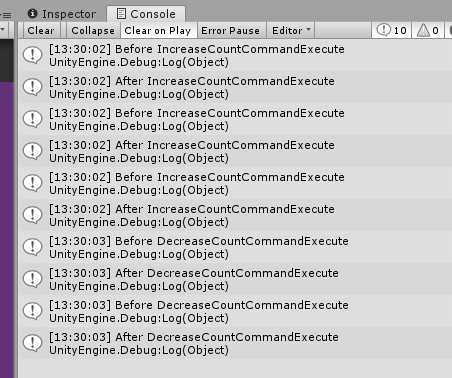
QFramework 提供了拦截 Command 的 API。
我们尝试在 CounterApp 中实现一个 Command 日志。
代码很简单,如下:
1
2
3
4
5
6
7
8
9
10
11
12
13
14
15
16
17
18
19
20
21
public class CounterApp : Architecture <CounterApp >{ protected override void Init () { this .RegisterSystem<IAchievementSystem>(new AchievementSystem()); this .RegisterModel<ICounterAppModel>(new CounterAppModel()); this .RegisterUtility<IStorage>(new Storage()); } protected override void ExecuteCommand (ICommand command ) { Debug.Log("Before " + command.GetType().Name + "Execute" ); base .ExecuteCommand(command); Debug.Log("After " + command.GetType().Name + "Execute" ); } }
只需要在 Architecture 中覆写 ExecuteCommand 即可。
运行之后,随意点击了几次按钮,结果如下:
这样就实现了一个非常简单的 Command 日志功能。
有了 Command 拦截功能,我们可以做非常多的事情,比如:
Command 日志可以用来方便调试
可以实现 Command 中间件模式 可以写各种各样额度 Command 中间件,比如
Command 日志中间件
可以方便你先撤销功能
可以用 Command 做自动化测试
等等
事件(Event)
在一个项目中,表现逻辑的调用次数,至少会和交互逻辑的调用次数一样多。因为只要修改了数据,对应地就要把数据的变化在界面上表现出来。
而这部分使用的表现逻辑的代码也会很多,所以我们引入一个事件机制来解决这个问题。
这个事件机制的使用其实是和 Command
一起使用的,这里有一个简单的小模式,如下图所示:
img
即通过 Command
修改数据,当数据发生修改后发送对应的数据变更事件 。
这个是简化版本的 CQRS 原则,即 Command Query Responsibility
Separiation,读写分离原则。
引入这项原则会很容易实现 事件驱动、数据驱动 架构。
对象(BindableProperty)
BindableProperty 是包含 数据 + 数据变更事件
的一个对象。
一般情况下,像主角的金币、分数等数据非常适合用 BindableProperty
的方式实现。
简单的用法如下:
1
2
3
4
5
6
7
8
9
10
11
12
var age = new BindableProperty<int >(10 );age.Register(newAge=>{ Debug.Log(newAge) }).UnRegisterWhenGameObjectDestoryed(gameObject); age++; age--;
非常简单,就是当调用 age++ 和 age--
的时候,就会触发数据变更事件。
BindableProperty 除了提供 Register 这个 API 之外,还提供了
RegisterWithInitValue API,意思是 注册时 先把当前值返回过来。
具体用法如下:
1
2
3
4
5
6
7
8
var age = new BindableProperty<int >(5 );age.RegisterWithInitValue(newAge => { Debug.Log(newAge); });
这个 API 就是,没有任何变化的情况下,age
先返回一个当前的值,比较方便用于显示初始界面。
BindableProperty 是一个独立的工具,可以脱离 QFramework
架构使用,也就是说不用非要用 QFramework 的 MVC 才能用
BindableProperty,而是可以再自己项目中随意使用。
具体用法:
1 2 3 4 5 6 7 8 Count.SetValueWithoutEvent(storage.LoadInt(nameof (Count))); Count.Register(newCount => { storage.SaveInt(nameof (Count),newCount); });
用接口设计模块(依赖倒置原则)
QFramework
本身支持依赖倒置原则,就是所有的模块访问和交互都可以通过接口来完成。
所有的模块注册、模块获取等代码都是通过接口完成,这一点符合 SOLID
原则中的 依赖倒置原则。
通过接口设计模块可以让我们更容易思考模块之间的交互和职责本身,而不是具体实现,在设计的时候可以减少很多的干扰。
当然面向接口的方式去做开发也有很多其他的好处,这当然是大家随着使用时长会慢慢体会的。
其中有一个重要的点,就是我们之前说的 Storage,如果想把存储的 API 从
PlayerPrefs 切换成 EasySave,那么我们就不需要去修改 Storage
对象,而是扩展一个 IStorage 接口即可,伪代码如下:
1
2
3
4
5
6
7
8
9
10
11
12
13
public class EasySaveStorage : IStorage { public void SaveInt (string key, int value { } public int LoadInt (string key, int defaultValue = 0 { throw new System.NotImplementedException(); } }
注册模块的伪代码如下:
1 2 3 4 5 6 7 8 9 10 11 12 13 14 15 public class CounterApp : Architecture <CounterApp >{ protected override void Init () { this .RegisterSystem<IAchievementSystem>(new AchievementSystem()); this .RegisterModel<ICounterAppModel>(new CounterAppModel()); this .RegisterUtility<IStorage>(new EasySaveStorage()); } }
这样,底层所有存储的代码都切换成了 EasySave
的存储,替换一套方案非常简单。
Controller
IController已在QFramework框架中给出,可直接使用
1
2
public class CounterAppController : MonoBehaviour , IController { # ... }
System
ISystem已在QFramework框架中给出,请先继承再使用
1
2
3
4
public interface IAchievementSystem : ISystem { } public class AchievementSystem : AbstractSystem ,IAchievementSystem { # ... }
Model
IModel已在QFramework框架中给出,请先继承再使用
1
2
3
4
5
6
public interface ICounterAppModel : IModel { BindableProperty<int > Count { get ; } } public class CounterAppModel : AbstractModel ,ICounterAppModel { # ... }
Utility
IUtility已在QFramework框架中给出,请先继承再使用
1
2
3
4
5
6
7
8
public interface IStorage : IUtility { void SaveInt (string key, int value int LoadInt (string key, int defaultValue = 0 } public class Storage : IStorage { # ... }
查询(Query)
负责数据的查询
Query 是 CQRS 中的 Q,也就是 Command Query Responsibility Saperation
中的 Query。
首先 Controller 中的表现逻辑更多是接收到数据变更事件之后,对 Model
或者 System 进行查询,而查询的时候,有的时候需要组合查询,比如多个 Model
一起查询,查询的数据可能还需要转换一下,这种查询的代码量比较多。尤其是像模拟警用或者非常重数据的项目,所以
QFramework 支持通过 Query 这样的一个概念,来解决这部分问题。
Query
是一个可选的概念,如果游戏中数据的查询逻辑并不是很重的话,直接在
Controller
的表现逻辑里写就可以了,但是查询数据比较重,或者项目规模非常大的话,最好是用
Query 来承担查询的逻辑。
Command 一般负责数据的 增 删 改,而 Query 负责数据的 查。
如果游戏需要从服务器同步数据,一般拉取服务器数据的请求可以写在 Query
中,而增删改服务器输的请求可以写在 Command 中。
使用的方式也很简单,和 Command 用法一致,这里我们写一个小的 App,
叫做 QueryExampleApp 代码如下:
1
2
3
4
5
6
7
8
9
10
11
12
13
14
15
16
17
18
19
20
21
22
23
24
25
26
27
28
29
30
31
32
33
34
35
36
37
38
39
40
41
42
43
44
45
46
47
48
49
50
51
52
53
54
55
56
57
58
59
60
61
62
63
64
65
66
67
68
69
70
71
72
73
74
75
76
77
using System.Collections.Generic;using UnityEngine;namespace QFramework.Example { public class QueryExampleController : MonoBehaviour ,IController { public class StudentModel : AbstractModel { public List<string > StudentNames = new List<string >() { "张三" , "李四" }; protected override void OnInit () { } } public class TeacherModel : AbstractModel { public List<string > TeacherNames = new List<string >() { "王五" , "赵六" }; protected override void OnInit () { } } public class QueryExampleApp : Architecture <QueryExampleApp > { protected override void Init () { this .RegisterModel(new StudentModel()); this .RegisterModel(new TeacherModel()); } } public class SchoolAllPersonCountQuery : AbstractQuery <int > { protected override int OnDo () { return this .GetModel<StudentModel>().StudentNames.Count + this .GetModel<TeacherModel>().TeacherNames.Count; } } private int mAllPersonCount = 0 ; private void OnGUI () { GUILayout.Label(mAllPersonCount.ToString()); if (GUILayout.Button("查询学校总人数" )) { mAllPersonCount = this .SendQuery(new SchoolAllPersonCountQuery()); } } public IArchitecture GetArchitecture () { return QueryExampleApp.Interface; } } }
运行之后,当按下查询按钮时,结果就会显示。
调试界面(Editor)
将底层的系统原型与简易的Editor界面配合,把数据和接口调好后,再与UGUI对接。
CoreKit 工具集
TypeEventSystem
15.内置工具:TypeEventSystem
Easyevent
16.内置工具:Easyevent
IOCContainer
18.内置工具:IOCContainer